Creating an application project
Setting up a new project
Creating a workspace
Creating the new project
Adding files to the project
Setting project options
Compiling and linking the application
Compiling the source files
Viewing the list file
Linking the application
Viewing the map file
* This tutorial introduces you to the IAR Embedded Workbench® integrated development environment (IDE). The tutorial demonstrates a typical development cycle and shows how you use the compiler and the linker to create a small application for your device. For instance, creating a workspace, setting up a project with C source files, and compiling and linking your application.
Setting up a new project
Using the IDE, you can design advanced project models. You create a workspace to which you add one or several projects. There are ready-made project templates for both application and library projects. Each project can contain a hierarchy of groups in which you collect your source files. For each project you can define one or several build configurations. For more details about designing project models, see the IDE Project Management and Building Guide for ARM®
Because the application in this tutorial is a simple application with very few files, the tutorial does not need an advanced project model.
Before you can create your project, you must first create a workspace.
Creating a workspace
The first step is to create a new workspace for the tutorial application. When you start the IDE for the first time, there is already a ready-made workspace, which you can use for the tutorial projects. If you are using that workspace, you can ignore the first step.
Choose File>New>Workspace. Now you are ready to create a project and add it to the workspace.
Creating the new project
You can find all the files needed for the tutorials in the arm\tutor directory. Make a copy of the tutor directory in your projects directory.
Note: If you copied all the files from the arm\tutor directory before you started with the tutorials, a project file will already be available in your projects directory. You can use that ready-made file, or create your own file.
1
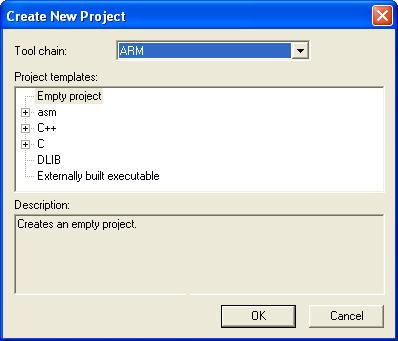
To create a new project, choose Project>Create New Project. The Create New Project dialog box appears, which lets you base your new project on a project template.
2
From the Tool chain drop-down list, choose the toolchain you are using and click OK.
3
For this tutorial, select the project template Empty project, which simply creates an empty project that uses default project settings.
4
In the standard Save As dialog box that appears, specify where you want to place your project file, that is, in your newly created projects directory. Type project1 in the File name box, and click Save to create the new project.
The project will appear in the Workspace window.
By default, two build configurations are created: Debug and Release. In this tutorial only Debug will be used. You choose the build configuration from the drop-down menu at the top of the window. The asterisk in the project name indicates that there are changes that have not been saved.
Note: The tutorials call the printf library function, which calls the low-level write function that works in the C-SPY simulator. If you want to run the tutorials in a release configuration on real hardware, you must provide your own write function that has been adapted to your hardware.
A project file—with the filename extension ewp—will be created in the projects directory, not immediately, but later on when you save the workspace. This file contains information about your project-specific settings, such as build options.
5
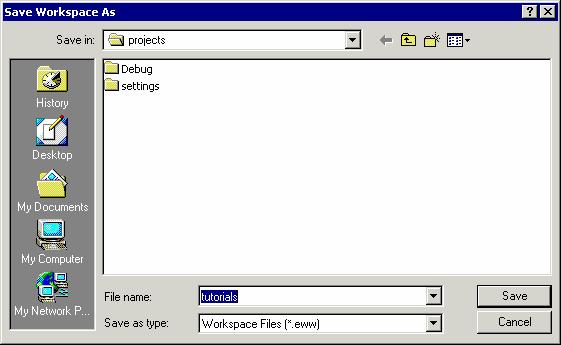
Before you add any files to your project, you should save the workspace. Choose File>Save Workspace and specify where you want to place your workspace file. In this tutorial, you should place it in your newly created projects directory. Type tutorials in the File name box, and click Save to create the new workspace.
A workspace file—with the filename extension eww—has now been created in the projects directory. This file lists all projects that you will add to the workspace. Information related to the current session, such as the placement of windows and breakpoints is located in the files created in the projects\settings directory.
Adding files to the project
This tutorial uses the source files Tutor.c and Utilities.c.
*
The Tutor.c application is a simple program using only standard features of the C language. It initializes an array with the ten first Fibonacci numbers and prints the result to stdout.
*
The Utilities.c application contains utility routines for the Fibonacci calculations.
Creating several groups is a possibility for you to organize your source files logically according to your project needs. However, because this project only contains two files, you do not need to create a group. For more information about how to create complex project structures, see the IDE Project Management and Building Guide for ARM®
1
2
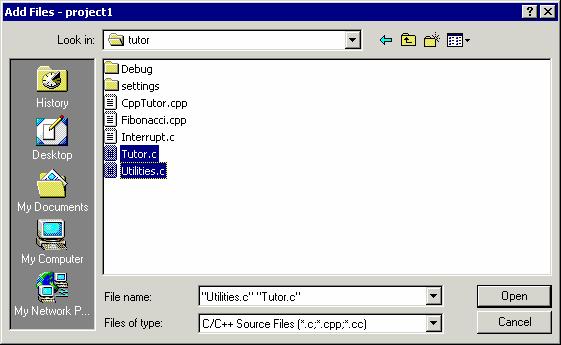
Choose Project>Add Files to open a standard browse dialog box. Locate the files Tutor.c and Utilities.c, select them in the file selection list, and click Open to add them to the project1 project.
Setting project options
Now you will set the project options. For application projects, options can be set on all levels of nodes. First you will set the general options to suit the processor configuration in this tutorial. Because these options must be the same for the whole build configuration, they must be set on the project node.
1
Select the project folder icon project1 - Debug in the Workspace window and choose Project>Options.
The Target options page in the General Options category is displayed.
Verify that these settings are used:
2
Select C/C++ Compiler in the Category list to display the compiler option pages.
3
 
Level: None (Best debug support)
Output list file
Assembler mnemonics
4
Click OK to set the options you have specified.
The project is now ready to be built.
Compiling and linking the application
You can now compile and link the application. You will also view the compiler list file and the linker map file.
Compiling the source files
1
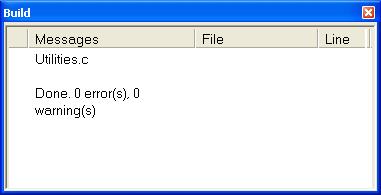
To compile the file Utilities.c, select it in the Workspace window.
2
Choose Project>Compile.
Alternatively, click the Compile button on the toolbar or choose the Compile command from the context menu that appears when you right-click on the selected file in the Workspace window.
The progress is displayed in the Build messages window.
3
Compile the file Tutor.c in the same manner.
The IDE has now created new directories in your project directory. Because you are using the build configuration Debug, a Debug directory has been created containing the subdirectories List, Obj, and Exe:
*
The List directory is the destination directory for the list files. The list files have the extension lst.
*
The Obj directory is the destination directory for the object files from the compiler and the assembler. These files have the extension o and are used as input to the ILINK linker.
*
The Exe directory is the destination directory for the executable file. It has the extension out, and is used as input to the IAR C-SPY® Debugger. Note that this directory is empty until you have linked the object files.
Click on the plus signs in the Workspace window to expand the view. As you can see, the IDE has also created an output folder icon in the Workspace window containing any generated output files. All included header files are displayed as well, showing the dependencies between the files.
Viewing the list file
Now examine the compiler list file and notice how it is automatically updated when you, as in this case, will investigate how different optimization levels affect the generated code size.
1
Open the list file Utilities.lst by double-clicking it in the Workspace window. Examine the list file, which contains the following information:
*
The header shows the product version, information about when the file was created, and the command line version of the compiler options that were used
*
The body of the list file shows the assembler code and binary code generated for each statement. It also shows how the variables are assigned to sections
*
The end of the list file shows the amount of stack, code, and data memory required, and contains information about error and warning messages that might have been generated.
Notice the amount of generated code at the end of the file and keep the file open.
2
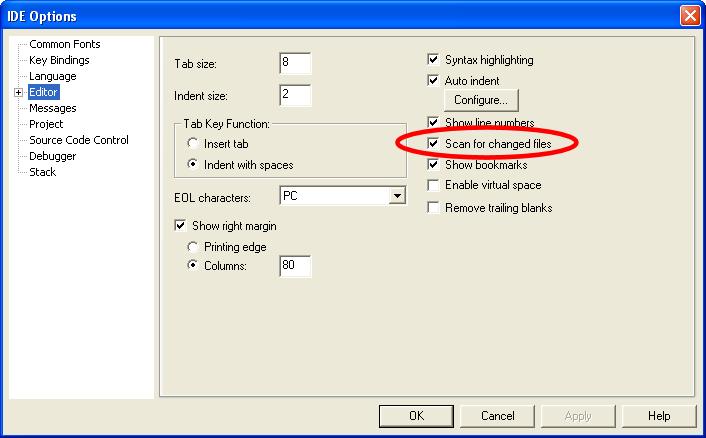
Choose Tools>Options to open the IDE Options dialog box and click the Editor tab. Select the option Scan for changed files. This option turns on the automatic update of any file open in an editor window, such as a list file.
Click the OK button.
3
Select the file Utilities.c in the Workspace window, right-click and choose Options from the context menu to open the C/C++ Compiler options dialog box. Select the Override inherited settings option. Click the Optimizations tab and choose High level of optimization. Click OK.
Notice that the options override on the file node is indicated with a red dot in the Workspace window.
4
Compile the file Utilities.c. Now you will notice two things. First, note the automatic updating of the open list file due to the selected option Scan for changed files. Second, look at the end of the list file and notice the effect on the code size due to the increased optimization.
5
For this tutorial, the optimization level None should be used, so before linking the application, restore the default optimization level. Open the C/C++ Compiler options dialog box by right-clicking on the selected file in the Workspace window. Deselect the Override inherited settings option and click OK. Recompile the file Utilities.c.
Linking the application
Now you should set the options for the linker.
1
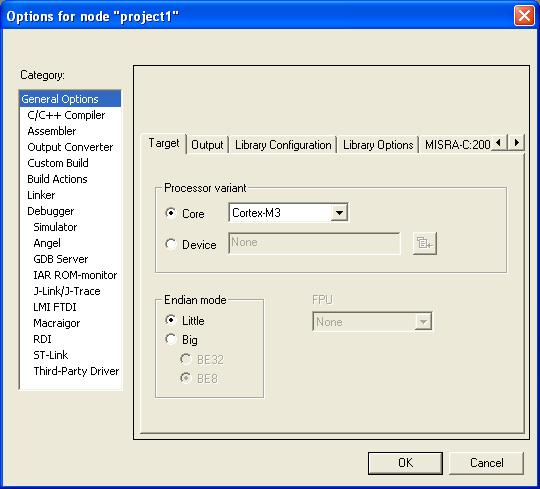
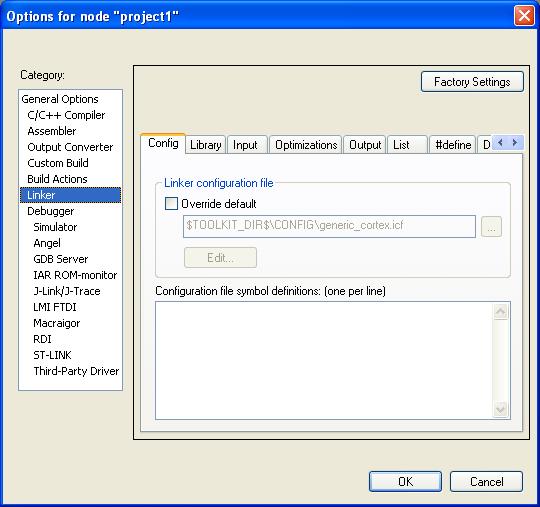
Select the project folder icon project1 - Debug in the Workspace window and choose Project>Options, or righ-click and choose Options from the context menu. Then select Linker in the Category list to display the linker option pages.
For this tutorial, the default factory settings are used. However, pay attention to the choice of the linker configuration file.
Output format
The linker produces an output file in the ELF format, including DWARF for debug information. If you need to have a file in the Motorola or Intel-standard formats instead, for example to load the file to a PROM memory, you must convert the file. You can use the converter provided with IAR Embedded Workbench.
Linker configuration file
Program code and data are placed in memory according to the configuration specified in the linker configuration file (filename extension icf). It is important to be familiar with its syntax for how sections are placed in memory.
Read more about this in the IAR C/C++ Development Guide for ARM®.
The definitions in the supplied linker configuration files are not related to any particular hardware. The linker configuration file template supplied with the product can be used as is in the simulator, but when using it for your target system you must adapt it to your actual hardware memory layout. You can find linker configuration files for some evaluation boards in the directory src\examples.
In this tutorial you will use the default linker configuration file, which you can see on the Config page.
If you want to examine the linker configuration file, use a suitable text editor, such as the IAR Embedded Workbench editor, or print a copy of the file, and verify that the definitions match your requirements. Alternatively, click the Edit button to open the linker configuration file editor.
Linker map file
By default, no linker map file is generated. To generate a linker map file, click the List tab and select the option Generate linker map file.
2
Click OK to save the linker options.
Now you should link the object file, to generate code that can be debugged.
3
Choose Project>Make. The progress will as usual be displayed in the Build messages window. The result of the linking is the code file project1.out with debug information located in the Debug\Exe directory and a map file project1.map located in the Debug\List directory.
Viewing the map file
Examine the file project1.map to see how the sections were placed in memory.
Read more about the map file in the IAR C/C++ Development Guide for ARM®.
The project1.out application is now ready to be run in C-SPY.